What is an feature and attribute place, and what exactly are they for?In one of our previous articles, we covered the process of product creation in Magento 2. Choosing the feature set is one of the first steps along the way of creating a product, so it would maximize sense to find out about attributes and feature sets, and how to create and configure them in Magento 2. Let's have a closer look. To be able to understand the idea of an feature and an feature set, let's use a good example: a handbag. A handbag can be identified by a sizable range of characteristics such as: color, materials, weight, size, etc. Many of these characteristics put together describe an attribute set (quite literally a couple of characteristics) and each of them individually can be an attribute (or specific feature) of the merchandise. Attributes on the whole help a few purposes: they could be used as search guidelines and conditions for split navigation (aka faceted filtration systems), they can play a part in product comparability reports to help a person distinguish one from another, plus they can help specify products during times of marketing promotions. By default, Magento has a set of system features (such as price, weight, size etc.) that you can use for your products, but if you need more properties to describe and filtering products in your catalog, you can create as many attributes as you will need. Overall, this can help your customer have best experience possible when shopping at the store. 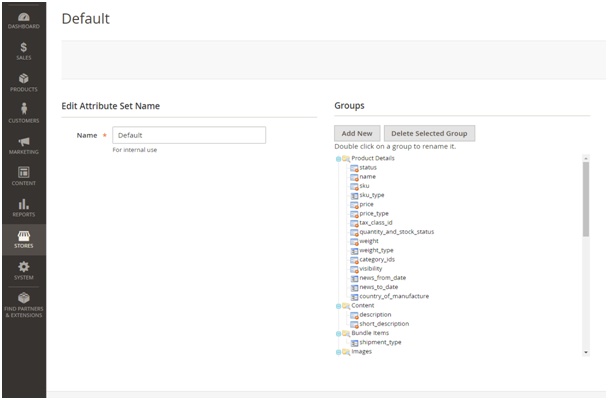
Planning Features and Attribute SetsOnce the attribute set for a specific product has been assigned, you won't have the ability to change it. The only way away: create the same product but with another feature set and take away the past (duplicated) product. That's why, it is so important to take into account what qualities and attribute packages you will want to assign your products in advance, before you start adding products. To create the merchandise "bag", you most likely will never have to create a particular attribute set merely to do so. You will find enough attributes in the Magento default attribute place (color, price, country of production, information, gallery, price, sku, visibility, weight etc.) which should describe all the product attributes you'll need to properly list this product. But, in the event you do need a little something extra (something like materials, pattern etc.), it would be a much better idea to make a completely new attribute collection that is more designed to your unique product needs.
While planning the attribute established for your product, it's also advisable to consider various other basic criteria: - Should your site sells several types of goods and each kind has differences in parameters, it makes the most sense for each and every type to obtain its own attribute set. In this manner, each product can be best displayed on your store as it can be.
- Become familiar with and become familiar with the default features, this could help you save lots of time and energy in the long run if each product type doesn't need to have it's own custom design template.
- When creating features, it's important to select the right attribute type from the drop down, to make your life easier throughout the rest of the process (text, dropdown).
- Text attributes do not impact split navigation or configurable products so these principles must result from a dropdown if you would like those attributes to be viewed.
- The fewer quantity of attributes created, small the repository will maintain the finish, which does mean the website will run faster.
- Separate features into tabs and create individual sections if possible. This helps improve the work of content professionals.
Ways of adding features in Magento 2Magento 2 enables you to include product characteristics in two particular ways. Let's take a closer take a look at our first option here: 1. Creating a custom attribute.Creating an attribute in Magento 2 consists of the following steps: 1. Go to Stores and select “Product” in the admin panel 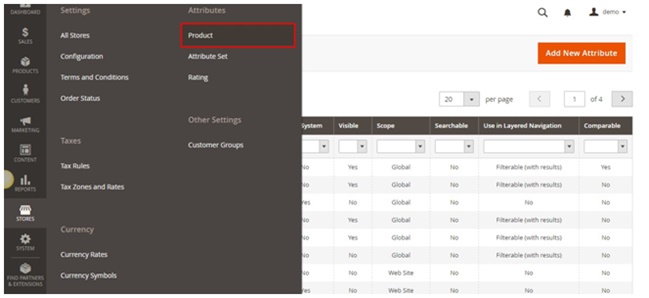
2. Then select “Add New Attribute” 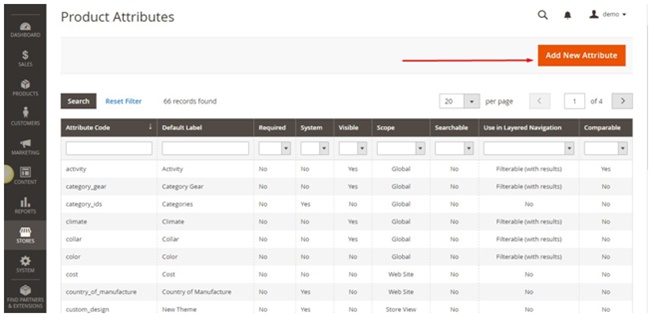
3. Choose some attribute properties: – Default Label: The label that identifies the attribute during data entry. For example, “Country of Manufacturer”, “Weight” etc. – Catalog Input Type for Store Owner: Determines the data type and input control that is used to manage the product from the store Admin. For example, text, multi-select etc. – Values Required: A required value needs to be entered in this field before the record can be saved. Set Values Required to “Yes.” (Options include Yes and No) 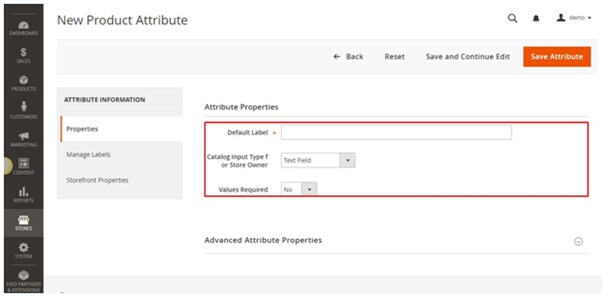
4. Choose advanced attribute properties if needed (Attribute Code, Scope, Default Value etc.) 5. Choose storefront properties 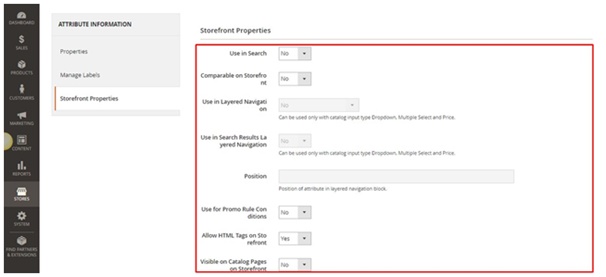
6. Save Attribute Now that we’ve created the necessary attributes that will be added to the attribute set, we just need to highlight the products that this will be applied to. We can do that next, in the following steps: - Go to Stores and select Attribute Set
- Open the necessary Attribute Set
3. Transfer your newly created attribute from ‘Unassigned Attributes’ column to ‘Groups’ 4. Click ‘SAVE’ and you’re good to go. In addition to creating custom attributes for your more unique and specific products, we can also make attribute lists from pre-existing attributes (or characteristics). Let’s take a closer look at how we can do that. 2. Choosing from the list of existing Attributes.Note: The following steps are not completely functional at the time of publication of this article. We’re going to walk through the process anyway, as everything should go as planned in future releases. However, if you don’t want to wait for this feature to become functionally available, you can always reach out to one of our Magento developers and they’ll gladly assist you in fixing this feature. Attributes can be selected and modified while actively working on a product, and in the following example, we’ll see how to add any attribute to a product from the list of existing options. Step 1: Open the product in the admin panel Step 2: Click ‘Add Attribute’ 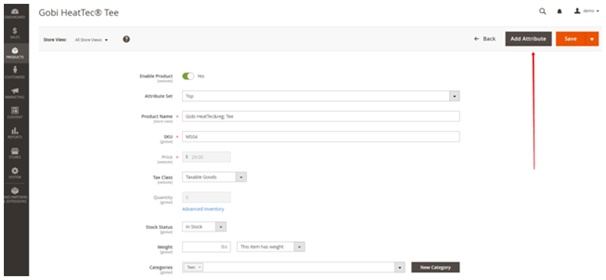
Step 3: Choose an attribute from the list and select ‘Add Selected’ 
Step 4: Save the product Attribute SetsAs we already mentioned, choosing the attribute set is one of the very first steps when creating a product and can also be used as a template for the product record. If you sell products that require specific types of information, such as cameras, it might be better to create a dedicated Attribute set that includes the specific attributes that are needed to describe each product (camera, watch, shoe, etc). Steps for creating an Attribute set: 1. From the Admin sidebar, select Stores, then under Attributes, select Attribute Set. 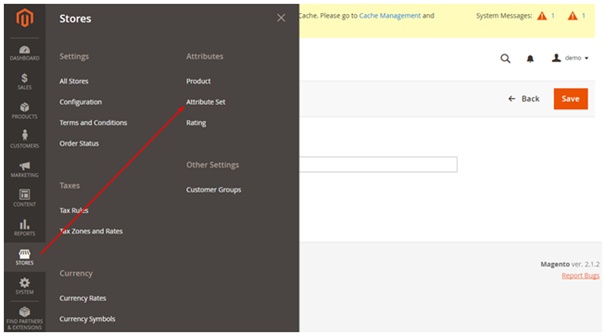
2. Click ‘Add New Set’ and then do the following: a. Enter a Name for the Attribute set (the name is completely up to you, as this is the part where you’re customizing your own Attribute set) b. Set “Based On” to an existing Attribute set to be used as a template. c. Click Save. 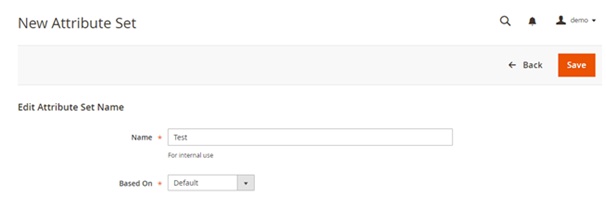
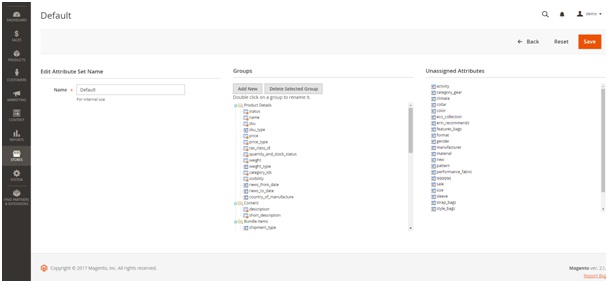
The next page will then display the following information: - The left column shows the name of the Attribute set we’ve just created. The name is for internal reference, and can be changed at any time as needed.
- The center of the page lists the current selection of attribute groups.
- The right column lists the selection of attributes that are currently not assigned to the Attribute set.
- To add a new attribute to the set, click and drag the attribute from the “Unassigned Attributes” list to the appropriate folder in the Groups column.
- When complete, select Save.
To create a new attribute group:1. In the Groups column, select the attribute set and click Add New. 2. Enter a Name for the new group (again, completely up to you as this is fully customizable) and click OK. 3. Do either of the following: - Drag Unassigned Attributes to the new group.
- Drag attributes from any other group, to the new one.
The new group you’ve just created now becomes a section of attributes that can be applied to any product that fits the overall category of this Attribute Set. After just a few simple clicks, we’ve created a custom template for our store products that help increase visibility to our customers. As usual, if any of this information seems a bit too intense or complicated, don’t hesitate to reach out to our Magento developers, or one of your project managers for more help and/or clarification. We’re here to make things easier, so don’t settle for something that isn’t working 100% for you and your store. Home: https://www.magebay.com
What is an feature and attribute place, and what exactly are they for?In one of our previous articles, we covered the process of product creation in Magento 2. Choosing the feature set is one of the first steps along the way of creating a product, so it would maximize sense to find out about attributes and feature sets, and how to create and configure them in Magento 2. Let's have a closer look. To be able to understand the idea of an feature and an feature set, let's use a good example: a handbag. A handbag can be identified by a sizable range of characteristics such as: color, materials, weight, size, etc. Many of these characteristics put together describe an attribute set (quite literally a couple of characteristics) and each of them individually can be an attribute (or specific feature) of the merchandise. Attributes on the whole help a few purposes: they could be used as search guidelines and conditions for split navigation (aka faceted filtration systems), they can play a part in product comparability reports to help a person distinguish one from another, plus they can help specify products during times of marketing promotions. By default, Magento has a set of system features (such as price, weight, size etc.) that you can use for your products, but if you need more properties to describe and filtering products in your catalog, you can create as many attributes as you will need. Overall, this can help your customer have best experience possible when shopping at the store.
Planning Features and Attribute SetsOnce the attribute set for a specific product has been assigned, you won't have the ability to change it. The only way away: create the same product but with another feature set and take away the past (duplicated) product. That's why, it is so important to take into account what qualities and attribute packages you will want to assign your products in advance, before you start adding products. To create the merchandise "bag", you most likely will never have to create a particular attribute set merely to do so. You will find enough attributes in the Magento default attribute place (color, price, country of production, information, gallery, price, sku, visibility, weight etc.) which should describe all the product attributes you'll need to properly list this product. But, in the event you do need a little something extra (something like materials, pattern etc.), it would be a much better idea to make a completely new attribute collection that is more designed to your unique product needs. While planning the attribute established for your product, it's also advisable to consider various other basic criteria: - Should your site sells several types of goods and each kind has differences in parameters, it makes the most sense for each and every type to obtain its own attribute set. In this manner, each product can be best displayed on your store as it can be.
- Become familiar with and become familiar with the default features, this could help you save lots of time and energy in the long run if each product type doesn't need to have it's own custom design template.
- When creating features, it's important to select the right attribute type from the drop down, to make your life easier throughout the rest of the process (text, dropdown).
- Text attributes do not impact split navigation or configurable products so these principles must result from a dropdown if you would like those attributes to be viewed.
- The fewer quantity of attributes created, small the repository will maintain the finish, which does mean the website will run faster.
- Separate features into tabs and create individual sections if possible. This helps improve the work of content professionals.
Ways of adding features in Magento 2Magento 2 enables you to include product characteristics in two particular ways. Let's take a closer take a look at our first option here: 1. Creating a custom attribute.Creating an attribute in Magento 2 consists of the following steps: 1. Go to Stores and select “Product” in the admin panel
2. Then select “Add New Attribute”
3. Choose some attribute properties: – Default Label: The label that identifies the attribute during data entry. For example, “Country of Manufacturer”, “Weight” etc. – Catalog Input Type for Store Owner: Determines the data type and input control that is used to manage the product from the store Admin. For example, text, multi-select etc. – Values Required: A required value needs to be entered in this field before the record can be saved. Set Values Required to “Yes.” (Options include Yes and No)
4. Choose advanced attribute properties if needed (Attribute Code, Scope, Default Value etc.) 5. Choose storefront properties
6. Save Attribute Now that we’ve created the necessary attributes that will be added to the attribute set, we just need to highlight the products that this will be applied to. We can do that next, in the following steps: - Go to Stores and select Attribute Set
- Open the necessary Attribute Set
3. Transfer your newly created attribute from ‘Unassigned Attributes’ column to ‘Groups’ 4. Click ‘SAVE’ and you’re good to go. In addition to creating custom attributes for your more unique and specific products, we can also make attribute lists from pre-existing attributes (or characteristics). Let’s take a closer look at how we can do that. 2. Choosing from the list of existing Attributes.Note: The following steps are not completely functional at the time of publication of this article. We’re going to walk through the process anyway, as everything should go as planned in future releases. However, if you don’t want to wait for this feature to become functionally available, you can always reach out to one of our Magento developers and they’ll gladly assist you in fixing this feature. Attributes can be selected and modified while actively working on a product, and in the following example, we’ll see how to add any attribute to a product from the list of existing options. Step 1: Open the product in the admin panel Step 2: Click ‘Add Attribute’
Step 3: Choose an attribute from the list and select ‘Add Selected’
Step 4: Save the product Attribute SetsAs we already mentioned, choosing the attribute set is one of the very first steps when creating a product and can also be used as a template for the product record. If you sell products that require specific types of information, such as cameras, it might be better to create a dedicated Attribute set that includes the specific attributes that are needed to describe each product (camera, watch, shoe, etc). Steps for creating an Attribute set: 1. From the Admin sidebar, select Stores, then under Attributes, select Attribute Set.
2. Click ‘Add New Set’ and then do the following: a. Enter a Name for the Attribute set (the name is completely up to you, as this is the part where you’re customizing your own Attribute set) b. Set “Based On” to an existing Attribute set to be used as a template. c. Click Save.
The next page will then display the following information: - The left column shows the name of the Attribute set we’ve just created. The name is for internal reference, and can be changed at any time as needed.
- The center of the page lists the current selection of attribute groups.
- The right column lists the selection of attributes that are currently not assigned to the Attribute set.
- To add a new attribute to the set, click and drag the attribute from the “Unassigned Attributes” list to the appropriate folder in the Groups column.
- When complete, select Save.
To create a new attribute group:1. In the Groups column, select the attribute set and click Add New. 2. Enter a Name for the new group (again, completely up to you as this is fully customizable) and click OK. 3. Do either of the following: - Drag Unassigned Attributes to the new group.
- Drag attributes from any other group, to the new one.
The new group you’ve just created now becomes a section of attributes that can be applied to any product that fits the overall category of this Attribute Set. After just a few simple clicks, we’ve created a custom template for our store products that help increase visibility to our customers. As usual, if any of this information seems a bit too intense or complicated, don’t hesitate to reach out to our Magento developers, or one of your project managers for more help and/or clarification. We’re here to make things easier, so don’t settle for something that isn’t working 100% for you and your store. Home: https://www.magebay.com | 

 Joomla
  Wordpress
  PrestaShop
  Magento
  osCommerce
  Drupal


